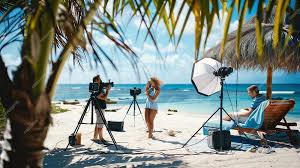
Traveling offers a unique opportunity to witness the world in all its dynamic beauty, yet capturing those fleeting moments requires more than just pointing a lens at the scenery. To create video content that truly resonates and retains a cinematic feel involves understanding the nuances of movement, light, and composition. Whether you are documenting a serene hike or a fast-paced city tour, the principles of professional videography remain the same.
Selecting the Right Gear for Mobility
The first step in upgrading your travel footage is evaluating your equipment based on the nature of your trip. Traditional cinema cameras are often too heavy for spontaneous adventures, which is why many creators turn to a compact action camera to maintain agility without sacrificing quality. These devices allow you to move freely through crowded markets or rugged trails while capturing high-resolution video that rivals larger systems.
Durability is another critical factor when choosing your primary filming tool for travel. Your equipment must withstand dust, moisture, and accidental drops that occur during transit. A rugged action camera is specifically designed to endure these harsh conditions, ensuring you never miss a shot due to hardware failure. This reliability is essential for maintaining a consistent narrative throughout your journey.
Versatility in mounting options can also significantly expand your creative possibilities. Being able to attach your device to a backpack strap, a vehicle dashboard, or a helmet provides unique angles that handheld shooting cannot achieve. An action camera excels in this area, offering a vast ecosystem of accessories that help you capture perspectives that would be impossible with a standard camera setup.
Mastering Frame Rates and Resolution
Understanding the technical settings of your device is paramount for achieving a professional look. Most modern devices, including a high-end action camera, offer various resolution options ranging from 1080p to 4K and beyond. Shooting in 4K allows you to crop into the image during post-production without losing quality, giving you flexibility to reframe shots or stabilize shaky footage.
Frame rate selection determines the “feel” of your video and how motion is perceived by the viewer. For standard talking scenes or scenic pans, 24 or 30 frames per second provides a natural, cinematic motion blur. However, if you plan to showcase fast movement, switching your action camera to 60 or 120 frames per second allows you to slow down the footage later for dramatic effect.
utilizing Slow Motion Effectively
Slow motion can transform a mundane scene into something magical, but it must be used sparingly. Capturing water splashes, bustling crowds, or birds in flight at high frame rates with your action camera creates a dreamy aesthetic. This technique emphasizes details that the human eye might miss in real time, adding a layer of sophistication to your travel montage.
Managing Storage Requirements
High-resolution video files consume storage space rapidly, especially when shooting at high frame rates. When relying on an action camera for the bulk of your B-roll, ensure you have multiple high-speed memory cards. It is good practice to offload your footage to a portable hard drive every evening to prevent data loss and free up space for the next day.
Stabilization Techniques for Smooth Video
Nothing separates amateur footage from professional clips quite like camera stability. Shaky video can be disorienting and difficult to watch, distracting the viewer from the subject matter. While a modern action camera often includes sophisticated electronic image stabilization, learning proper physical handling techniques is still necessary to achieve that “gliding” effect seen in documentaries.
When shooting handheld without a gimbal, keep your elbows locked close to your body to create a natural tripod. Walk with your knees slightly bent to absorb the shock of your footsteps, a technique often called the “ninja walk.” This method, combined with the internal stabilization of your action camera, results in buttery smooth tracking shots that look like they were filmed on rails.
Composition and Framing Strategies
Rule of thirds is a foundational concept that applies just as much to videography as it does to photography. Instead of always placing your subject in the dead center, align them with the grid lines to create a more balanced and visually interesting composition. Even when using the wide-angle lens of an action camera, mindful framing can guide the viewer’s eye to the most important elements of the scene.
Depth is another element that adds a professional touch to two-dimensional video. Try to include foreground elements like foliage, a railing, or a window frame to create a sense of scale and immersion. An action camera is particularly good at this because its wide field of view keeps both the foreground and the sweeping background reasonably sharp, establishing the context of your location.
Utilizing Natural Light
Lighting can make or break your footage regardless of how expensive your camera is. The best travel videos often utilize the “golden hour,” the period shortly after sunrise or before sunset when the light is soft and warm. Shooting during these times avoids the harsh shadows and blown-out highlights that often plague midday footage, especially on the smaller sensors found in a typical action camera.
If you must shoot under the harsh midday sun, try to position your subject in the shade or with the sun behind them to create a backlight effect. Using neutral density (ND) filters is a pro tip for controlling exposure in bright conditions. These filters act like sunglasses for your action camera, allowing you to maintain a cinematic shutter speed without overexposing the image.
Capturing High-Fidelity Audio
Audio is often the most overlooked aspect of travel video, yet it constitutes half of the viewing experience. Wind noise is the enemy of outdoor filming, particularly on breezy coastlines or mountain peaks. While the internal microphones of an action camera have improved, they are still susceptible to wind buffeting, which can render the audio unusable.
Invest in a foam windslayer or a “dead cat” windshield if you plan to record ambient sound or vlogs outdoors. These simple accessories can drastically improve audio clarity. Alternatively, recording external audio on a separate recorder or your phone and syncing it later can provide a rich soundscape that matches the visual quality of your action camera footage.
Creative Angles with an Action Camera
One of the greatest advantages of travel filmmaking is the ability to show the world from your unique point of view. POV shots place the audience directly in your shoes, making them feel as though they are participating in the activity. An action camera mounted to a chest harness or backpack strap captures your hands interacting with the environment, whether you are steering a bike or tasting street food.
Low-angle shots can also make environments look more imposing and majestic. Placing your action camera on the ground and tilting it up towards a landmark can exaggerate its height and grandeur. This perspective is rarely seen by the average tourist, making your footage stand out immediately as a creative interpretation of the location rather than a simple record.
Underwater and Weatherproof Filming
Travel often involves elements that would destroy standard electronics, such as rain, snow, or ocean saltwater. This is where the waterproof nature of an action camera becomes indispensable. It allows you to transition seamlessly from land to water, capturing the vibrant marine life of a coral reef or the intensity of a waterfall without bulky housing.
When filming underwater, red light is absorbed quickly, leaving footage looking blue or green. To counteract this, use a red diving filter on your action camera or adjust the white balance settings manually. This simple adjustment restores the natural colors of the underwater world, ensuring your aquatic footage looks as vibrant and professional as your terrestrial shots.
Storytelling and Editing Workflow
The final piece of the puzzle is assembling your clips into a cohesive narrative that tells a story. Avoid simply stringing together random highlights; instead, look for a beginning, middle, and end. You might start with wide establishing shots taken with your action camera to set the scene, move to medium shots of the activity, and finish with close-ups of details or emotions.
Music selection sets the pacing and mood of your edit, so choose tracks that complement the energy of your footage. Cut on the beat of the music to create a rhythmic flow that keeps the viewer engaged. Modern editing software can easily handle the high-bitrate files from an action camera, allowing you to color grade and fine-tune the visuals to match your creative vision.
Maintaining Consistency
Consistency in style and quality helps build a recognizable brand for your content. Try to stick to a specific color palette or grading style throughout your video. If you are mixing footage from a drone, a phone, and an action camera, ensure the colors match as closely as possible during the editing process to avoid jarring transitions that break the immersion.
Regular practice is the only way to truly master these techniques. Bring your action camera with you on small local trips to experiment with settings and angles before embarking on a major expedition. By refining your workflow and understanding the capabilities of your gear, you will be ready to capture professional-quality footage the moment your next adventure begins.